Thursday, August 27, 2015

Pickled Gherkins

pickled gherkins

I have chosen to make some pickle with the gherkins which we harvested this week.
Here is the recipe I use:

1 kg Gherkins
5 Tbsp Salt
1 bunch of fresh dill or 1 teaspoon of dried dill
1 Tbsp Peppercorns
4 Juniper Berries
4 Bay Leaves
1/2 tsp Fennel seed
500 ml White Wine Vinegar
500 ml water
80 g Sugar

Wash the gherkins and rub dry.
Place in a bowl and add the salt.
Just cover the gherkins with water and allow to stand overnight.

The next day, dry the gherkins and cut into pieces.

Using a pestle and mortar, crush the herbs.
Add these to the canning jars, and add the gherkins.
In a pan, add the vinegar and water. Bring to the boil and stir in the sugar until completely dissolved.
Pour the liquid over the veg and seal.
Place bottles on their heads to vacuum.
Allow these bottles to stand for about 3 weeks before opening.
Enjoy!


SuperCloset SuperRooms are the most complete and prestigious grow room kits available
Pin It!

Wednesday, August 26, 2015

Harvesting Rewards

Homesteading Harvest

Our gardening efforts are paying out :)

This is what we managed to harvest yesterday:

gurken

zucchetti

green bean

black beans

Gherkins
Zucchini/Marrow
Beetroot (a rather munched on beetroot)
Green Beans
Black Beans

I have frozen the green beans for later in the year, and am busy drying the black beans.

ratatoullie

With the marrow I made a couple of liters of Ratatouille to freeze - this is a loved favourite in our home.


I am not sure what I will be doing with the beetroot, but I guess I will be adding it to a salad.

I will be pickling the gherkins - I will share the recipe with you tomorrow :)

See you soon
x

September Is Wine Month, Save 10% On Wine Storage, CODE: WINE10
Pin It!

Friday, August 7, 2015

Garden Update

balcony tomatoes

Our balcony produce is growing like crazy!
I think the temperatures in this corner are optimal and the plants are loving it :)

These are our cherry tomato plants - They grew to a height of roughly 3m!

As you can see there is now a plank in front of them as they became too heavy for the pots and keeled over :(

I am hoping we haven't lost to many of them in the process, but only time will tell!

cherry tomatoes

Next up: Our Gem squash:

gem squash

It too loves it's place in the sun, but so far we have only been able to harvest 3 squashes and I am hoping that we will be able to enjoy many more of them before the season comes to a close.

balcony pumpkin

Here we have pot pumpkin and pot bell peppers.

So far nothing much to write home about, I do hope that will change soon!

In the garden things are growing nicely :)

garden views

sweetcorn


brocolli

How does your garden grow?

See you soon
x

Freeze Dried Emergency Food
Pin It!

Thursday, August 6, 2015

Dehydrating for the Seasons Finale

dehydrating for storage

As the season is in full swing I have pulled out my dehydrator to get some preserves made and other goodies dehydrated for storage.
(If you would like to know more about our dehydrator you can find my post on that HERE)

I started out by dehydrating some peaches to make Chutney (you can find my Chutney Recipe HERE)

dehydrating peaches

how to make south african chutney

Look at that gorgeous goodness - if you are South African you will know what I mean :)

After the chutney, I dehydrated 2kg of carrots for my storage.

They went from this:

dehydrating carrots

To this:

2kg of dehydrated carrots

Yes, this is 2kg of carrots :)
If you would like to know how to dehydrate carrots, I explained my procedure in a post HERE

I have been wanting to try dehydrating some pasta sauce for a while now, so I thought that while I have my machine out I will give it a bash.

dehydrating pasta sauce

We haven't re-hydrated it yet to try it out for taste, but once we do, I will let you know how it tastes :)

Do you dehydrate your harvest for storage?

See you soon
x

September Is Wine Month, Save 10% On Wine Storage, CODE: WINE10
Pin It!

Wednesday, August 5, 2015

Peppermint Sirup

Peppermint Sirup

I was rummaging through the garden last week and weeding it.
Because I let last years garden go crazy so that the bees had a wonderful wild patch to go to, my mint thrived.
So much so that this year it keeps wanting to take over my beds!

We keep pulling it out, to have it all back a couple of days later.
So when I pulled out bushloads of the stuff last week, I thought it would be a real shame to get rid of it all the time, when I could just use it for something.

My daughter had just come home from a visit and brought home a bottle of homemade Peppermint sirup - That was the something I wanted to make!

It is so simple that I am going to share the recipe with you here today too :)

peppermint

You will need:

Some Peppermint leaves - a good bunch of them (You can see how much I used for each batch in the above image) Remove the leaves from the stems
50g of Citric Acid 
3 litres of water
1,5kg Sugar

citric acid

peppermint in water

Mix the citric acid with the water and pour over the leaves.
Allow to sit for a day.

peppermint after a day

After a day the leaves will have turned a little brown.

Remove the leaves from the water and place the water in a big enough pot to hold water and sugar.

Bring sugar and water to the boil and then remove from heat filling into your bottles.

And there you have it - refreshing peppermint sirup that should last for quite a while in your storage (be sure to fill your bottles to the brim to vacuum them)

Did you try this recipe?
How did you like it?

See you soon.
x


shopOrganic&shopGMOfree&For The Greater Goods
Pin It!

Thursday, July 16, 2015

What to do with all that Garlic?

Garlic in Olive Oil

I find that here in Europe my garlic tends to go off really quickly.
Within a week of buying them they tend to be spongy and not very nice.
If you have the same problem, then here is a solution you may want to consider.

What I do is take all of my fresh garlic, peel and place in my food processor.
I whiz briefly and then add some olive oil and whiz again to combine the ingredients.

Then I fill the garlic into a glass container, pour a little extra olive oil over the stop and stir.

Store in the fridge.

For cooking I gauge about 1/4 - 1/2 teaspoon for a clove of fresh garlic.

Keeps good for quite a while.
Be sure to keep the garlic immersed in the olive oil, otherwise it can go moldy.

See you soon.
x

shopOrganic&shopGMOfree&For The Greater Goods
Pin It!

Wednesday, July 15, 2015

Pinterest Tried And Tested: Key Lime Pie in a Glass Please :)

Key Lime Pie in a Glass please

When I saw this recipe on Pinterest I had to give it a go.
I mean the ingredients - Limes and Condensed Milk - sounds amazing!

I used the recipe from this Pin
It is called Brazilian Lemonade, and I can tell you it really does hit the spot!

tried and tested Pinterest Recipe Link Up


Have you made something from Pinterest lately that turned out really well?
Have you tried a recipe that you wouldn't recommend?

We would love to hear from you!


Share your links below.
x

Pin It!

Tuesday, July 14, 2015

Potjie Anyone?

potjie size 10

potjie

We are thrilled!
Our potjies (dutch ovens) arrived last week.
We will be seasoning these babies over the weekend and then will share some yummy recipes with you all really soon :)

shopOrganic&shopGMOfree&For The Greater Goods
Pin It!

Friday, May 22, 2015

Pickled Apricots

Pickled apricots

Today I would like to share two really great variations of apricot pickle with you.
If you like a bit of tang and like pickled veggies, you may love the taste of pickled apricots!

Pickled apricots go well with cheese dishes, like our typical winter Raclette (a Swiss Cheese Dish)

First up:

Pickled Apricots

pickled apricots

For this recipe you will need:

1kg Firm Apricots, halved and pitted
600ml White Wine Vinegar
500g Sugar
1 Cinnamon stick 
(If using more than 1 jar break in half so that each jar will have a piece)
2-3 Cloves
8-10 Peppercorns
Canning Jar/s

 In a pot place the water, vinegar, sugar and herbs.
Bring to a rolling boil and the place the apricots inside for 2 minutes.
Remove the pot from the heat and place the apricots into your jar/s.
Bring the liquid once more to a rolling boil and boil for another 2 minutes.
Remove from the heat and pour over the fruit straight away, dividing the spices between the jars if you are using more than one..
Fill the jar with the liquid until just under the rim (if need be boil a little more vinegar to fill jar), seal and place the jar on it's head.

After 5 - 10 minutes turn jar upright and allow to cool.
Check the vacuum once cool (the lid should be slightly concave)

Label and store.

Sweet and Sour Apricots


For this recipe you will need:

1kg Firm Apricots, halved and pitted
150 ml water
300ml White wine vinegar
500g sugar
2 Star Anis
3cm Root ginger, peeled and finely chopped
3-4 Cardamon pods
Canning jar/s

In a pot place the water, vinegar, sugar and herbs.
Bring to a rolling boil and the place the apricots inside for 2 minutes.
Remove the pot from the heat and place the apricots into your jar/s.
Bring the liquid once more to a rolling boil and boil for another 2 minutes.
Remove from the heat and pour over the fruit straight away, again dividing the spices between the jars if you are using more than one.
Fill liquid to just under the rim of the jar (if need be boil a little more vinegar and water at a 2:1 ratio to fill jar), seal and place the jar on it's head.

After 5 - 10 minutes turn jar upright and allow to cool.
Check the vacuum once cool 


Label and store for the wintry months, or until you can't bear it any longer and need to try it ;)

I would love to hear your feedback on how you liked these pickles.
Do you make fruit pickles?

Until next time
x

Pin It!

Thursday, May 21, 2015

Apricots a Little Differently

apricots a little differently

Apricots are on special at the local store this week, so I bought 4kg of them.

Now, we are not a big apricot jam kind of a family and I only need apricots for a couple of recipes that I have on hand, but I bought these apricots with a definite scheme in mind namely - Winter and Pickles!

The first plan was to add some apricots to our Rum Pot.

Rum pot

To do so, I cut the apricots in half and covered them with sugar for an hour.

rumtopf

I then added them and the sugar to the pot which I started to fill in March

As you can see (if you can, the pot is very dark so the photos just don't come out like I hope :(), the strawberries have lost their wonderful red colour to the rum, but it does smell rather good already :)

Once I added the apricots, I topped the pot up with some more rum to make sure that all my fruit is covered, replaced the upturned plate and then put it aside again.

(If you would like to make your own Rum Pot for the upcoming Winter and festive season you can read how to Here)

Once that was done I went about making the pickles.

Join me tomorrow to find out how to make some amazing pickled apricots to delight your palette over the winter months.

Have you made a rum pot before?
Do you add anything extraordinary to it?

See you tomorrow.
x

Pin It!

Wednesday, May 20, 2015

Rumtopf - Rum Pot

One of my favourite things to do, once all the various spring and summer fruit start to show themselves, is to put together a "Rumtopf" or "Rum-Pot" directly translated, which basically boils down to laying fruit in rum over many months. The end result is, well yummy!


I will continue posting about my Rum pot as I fill it up with this and that as the various fruits come into season, so do follow my blog and keep yourself updated on progress and various how-tos :-D


My tip for a rum pot is this: Try to use local FRESH produce in season for the best taste, and if possible organic (I know this is not always possible, so just wash the fruit you are using before adding them to the pot).


The rule of thumb for this recipe is - half as much sugar as fruit, and cover with rum. Simple right!


Okay, so what will you need to start up? 


You will need:

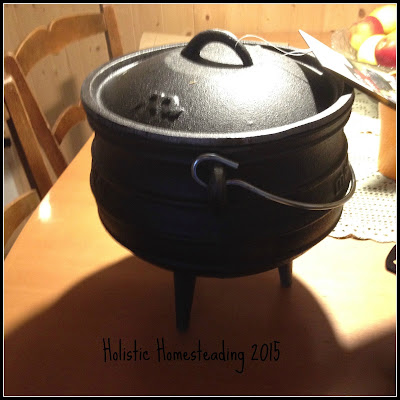
A rum pot or a large wide-necked glass container with lid. 
A saucer or plate that fits comfortably into your container
(a great alternative is to use a plastic picnic plate which you can cut to the size of your container, it needs to fit snuggly)
Rum - enough to keep each batch of fruit covered
Sugar
Fruit which is ripe, but not overly ripe!


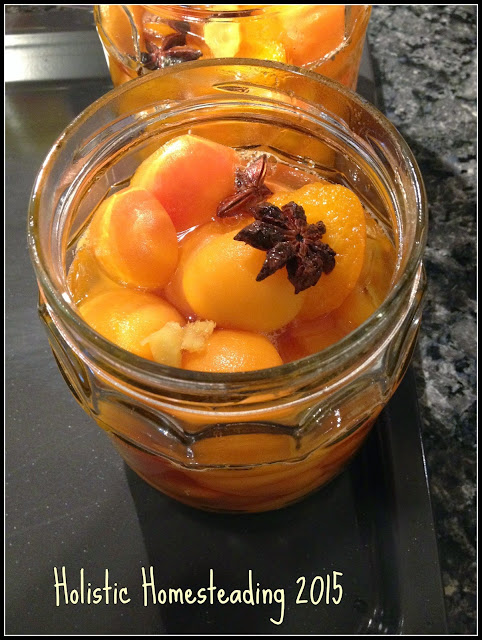
Start by weighing out the fruit you will be putting inside the pot, wash it and cut into pieces. Weigh out half as much sugar. I cut the stems off the strawberries and cut them in half.
Lay them in the pot, and cover them with the sugar.


Cover with rum so that the fruit is fully submersed.


Place your plate upside down on top of the fruit to hold it under the liquid. This is an important step, as if the fruit float to the top of the liquid they can start to go moldy, so totally submersed is the key!


Cover your pot with its lid. I also cover my lid and pot with cling-wrap as my lid does not seal, so for the extra protection.


Allow to stand in a cool area.

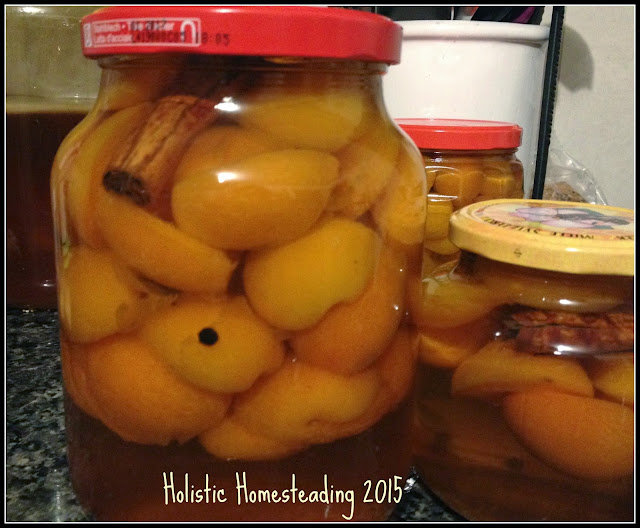
I only had strawberries and so I started with them. If you have more local produce available to you at the same time, then you would go ahead and add each of the layers of fruit, sugar and rum until all your fruit is inside and covered with liquid. 

Here is a list of fruits that I found via Google which should and shouldn't go inside your pot! I really stick to local here and end up generally adding the following: cherries, plums, peaches, prunes, grapes, and strawberries. I have put in cantaloupe one year and it didn't turn out all too badly, but it was rather a firm melon!

Fruits that work well in the rum pot:
Pineapple (remove rind & core and cut in large cubes)
Cherries (I don't pit mine, but feel free to do so)
Apricots (halves, pitted)
Nectarines (halves, pitted) 
Peaches (remove pits and cut in halves, quarters, or slices)
Plums (remove seed and half or quarter)
Grapes (sweet seedless red or green grapes are ideal)
Strawberries (don't wash, just remove stem & leaves).  Strawberries will soften and lose their bright red color as the soak up the rum. 
Raspberries (don't wash). Raspberries will lose some of their bright red color.
Red currants (removed from stem)
Gooseberries (remove stems)

The following fruits are not recommended:
Blackberries or Blueberries (they can be bitter and can discolor the other fruits)
Watermelon and Cantaloupe chunks (can make the mixture watery)
Rhubarb (can make mixture sour)
Bananas (too mushy)
Citrus (too acidic)
Apples (take on an odd texture)
Kiwi fruit


My rum-pot will now stand in my cellar until I have my next batch of fruit and then I will top it up with the new and again allow to stand. The pot should be filled by autumn where it will once again stand until around Christmas time. 

I generally find that I make one of these once every two years and they last just as long. It is absolutely delicious over vanilla ice-cream or just like that after a hearty meal. Wonderfully warming! But do be careful, it can be quite potent!

Hope you enjoy making your Rum pot.
x

P.S. I originally posted this post on my blog, Marigolds' Loft in 2012 but I felt it would be nice to have it here as a reference for those of you who need it, I have updated it with the relevant extras  :) 

Pin It!

Infolinks In Text Ads